Vextend Office Help Page
This help site is a work in progress. I will attempt to add new documentation as features are worked on within the Extension. So far the only info is for Gift Cards and enabling API access.
Main features
- Label Printing
- Page formatted Printing (Products Page and Stock Orders)
- Stock Control Tools (Including Super Import)
- Product Page Improvements
- Gift Card Management
- Workflows
Label Printing
Lightspeed's main label printer is...limited. Plus, sku's are created as part of the barcode and appear fuzzy. Additionally, the workflow is not optimized for minimal clicks, and label printing is not available from some obvious pages.
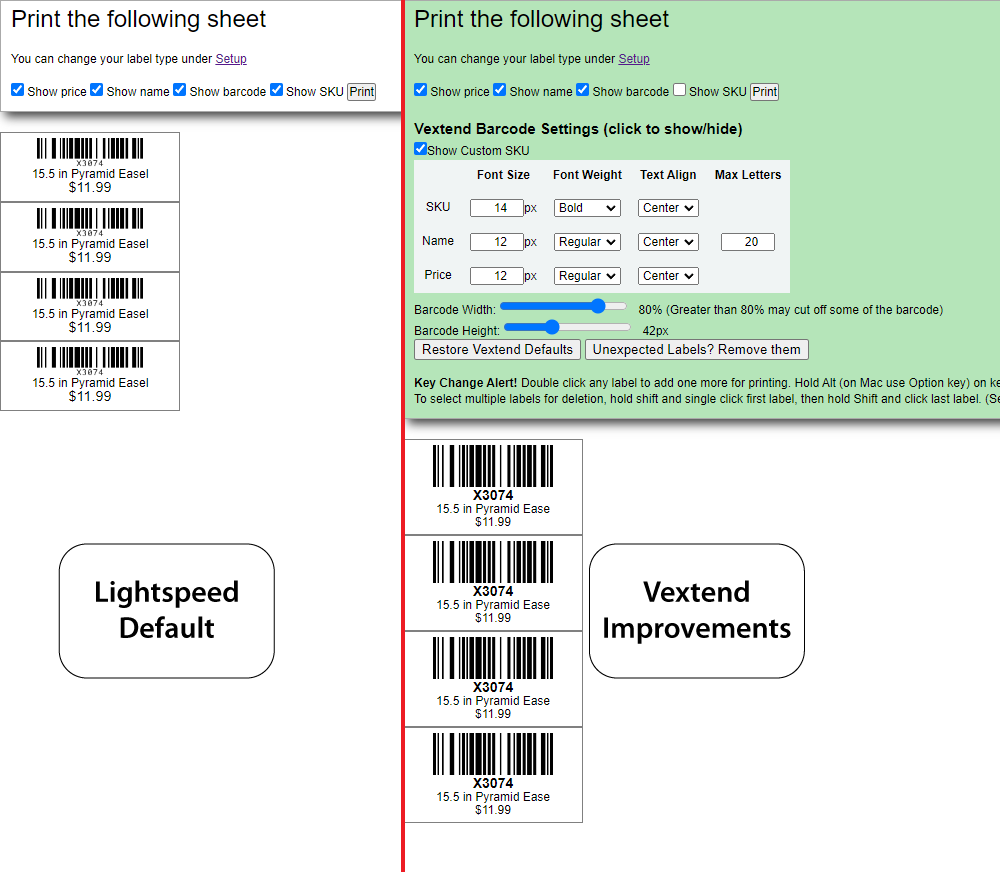
Label Printing Methods
The old window is still the default option. To change back to the improved In-Page Popup, navigate to the Extension Options.
Label printing can be handled two different ways:
- Improved Lightspeed Window (Default): This has been the default method since the inception of this extension. For print functions that trigger the new tab with Label printing, the page will now have extra features to modify the layout. This method is the most compatible as it should work with whatever your default label type is as selected by your account. However, we have a gut feeling that Lightspeed may eventually discontinue this page.
- In Page Popup (New May 2023): This method now mimics a popup style that Lightspeed uses from the Product Search page. Works best for continuous/roll type labels, but may work for other types.
This formatting affects printing from anywhere in Lightspeed except from the new 'Print Labels' menu in the Products list page. However, this same menu has a 'Vextend Print Labels' option, so you can achieve the same result using the formatted printing. Plus, the Add/Edit product page has a button created by Vextend to print from that page.
Notes:
- Use the Max Letters box is to limit how many characters are printed, because if center aligned long product names will cut off the side thus showing only the middle. Max letters helps ensure you only cut off text at the end of the product name.
- Using trial and error, test to see how tall you can safely make the barcode without cutting off any info. Larger barcodes almost always equals easier scanning.
- Depending on your Chrome print settings, you typically want your barcode width no more than 80% of the printable area so bars don't get cut off. Always watch when printing that you get a thick bar at the front and end. Scan test barcodes to make sure they are scanning.
- Label printing is also available from the Products page, Stock Control View Order, and with API access is available from the Stock Control Receive page so you can print labels while receiving.
- The 'In Page Popup' method also supports creating labels where you can enter all the details including name, price, and SKU. Helpful if you want modified names printed on labels.
Stock Control Tools
Super Import
Vextend Super Import allows you to import items into a purchase order that are either brand new items or existing items. Super Import will search for existing items (based off supplier code), and bring up relevant existing details if details have changed. Barcodes can also be assigned during this process. See video for a tutorial. Please Note:
- API access must be enabled for Super Import.
- Error handling is limited as of now. If an item is not importing, make sure that another item with the same name or SKU does not already exist in Lightspeed, even if it's from a different vendor.
- If barcodes won't generate, make sure that code is not already used elsewhere
- When dragging down numbers to duplicate values, by default a number will auto increment instead of copy. Select two rows before grabbing the drag square to copy instead of increment.
- Save for Later allows you to return to this spot for this order. Data from the table cannot be transferred between orders.
- Super Import is still a beta tool with some glitches. Bad data can be the first culprit as there is minimal error handling. Our business has successfully used the tool on more than 100 incoming orders, but use at your own risk. Generally you cannot "screw up" your data beyond importing items that may need deletion later.
- We recommend keeping imports to under 150 items at a time. Larger imports may throw errors or time outs. Multiple imports can be used to add more items to the same order.
Other Stock Control Tools
- Most other added tools are self explanatory.
- On the receiving page, use the arrow to receive all for line item. With API access you can also print labels from this page.
- On pending and received orders, print only select labels using the 'Print Selected Labels' button. You can also send the table to the Vextend Table Print with 'Print Report' which will provide a printer friendly format.
- With API access, delete items from a stock order with the 'Empty Order' button from the Consignment View. Note that this only clears items from the order, but doesn't change or delete the actual items. This cannot be undone. Note that due to the way Lightspeed handles new items being added, the Line Number will continue from the last item added to the order, not starting over at '1'. This doesn't affect the inventory accept for aesthetics of looking at line numbers.
Gift Card Management
Unlock more tools for managing gift cards than what is provided by default in Lightspeed.
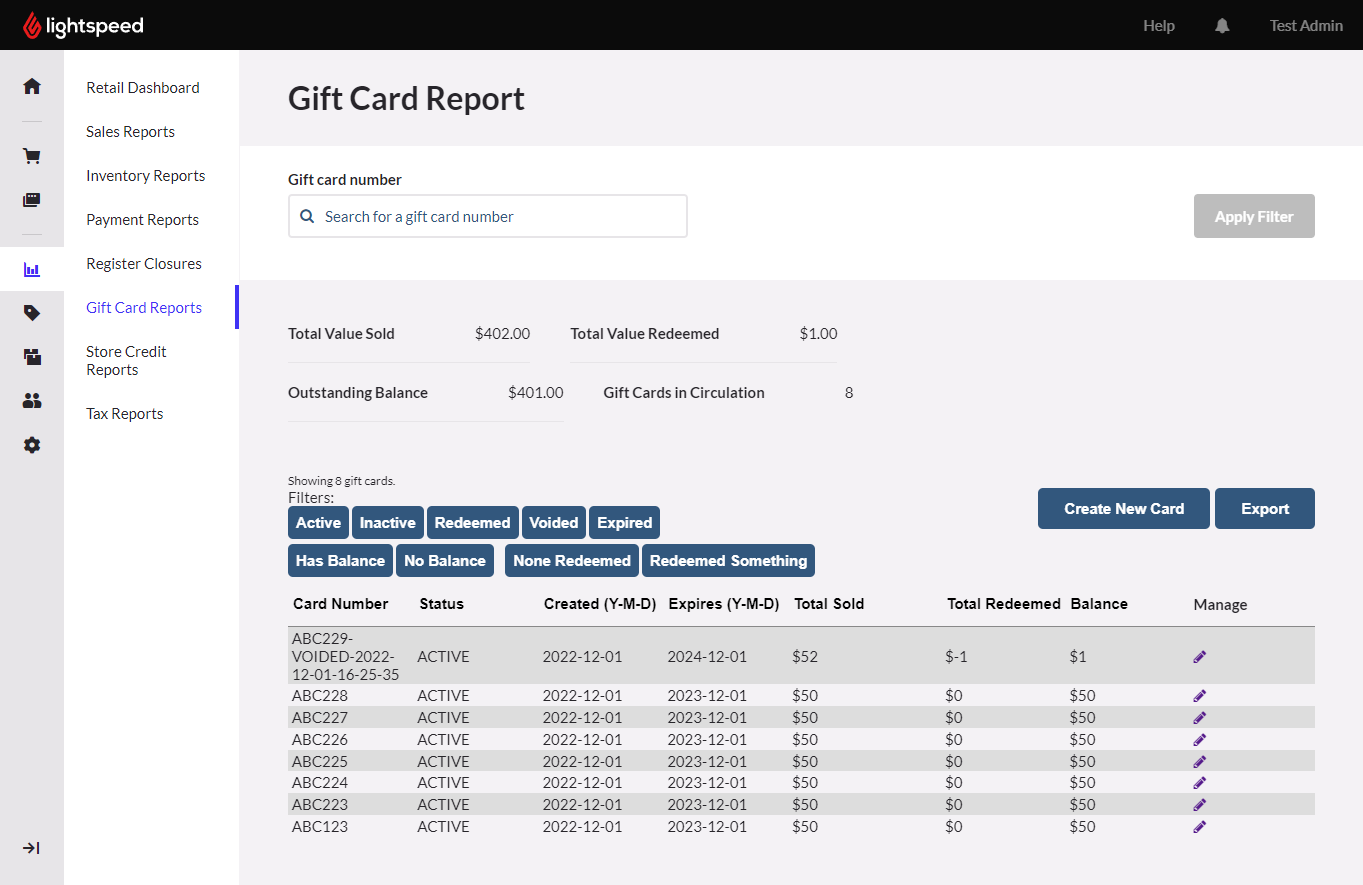
- Vextend Sell gift card management features requires access to the API. None of these features will appear if API access is not enabled.
- To begin, go to Reports>Gift Card Reports.
- By default, you see Lightspeed's normal reporting tool, but you can't make any edits. (If you were to go to Products>Gift Cards, you can enable gift card, and set default expiration dates. If you need to add a lot of cards, that's still the best way to do it.)
- Assuming you are still in Gift Card Reports, click the button 'Use Vextend Gift Card Tool Instead.
- You will now see an updated table of info with more data.
Exiting Vextend View
To return to the normal view, refresh your page (F5). After each save of new/edited cards, the page will automatically refresh.
Filtering Cards
- By default, all cards are showing because all filters are set as 'Show' (blue). If you click on a filter, any it will remove any cards that match that condition from your view.
- You can also click on Column Headings to sort.
- For more advanced filtering/sorting, use the Export button to save as a CSV.
- If you need to search for a specfic card number, just use your browser's built in search features (Ctrl-F).
Exporting Cards
- You can export the list as a .CSV by using the Export button.
Creating New Cards
When you are selling gift cards in Lightspeed, you should always sell via the Sell Screen. However, there are times where a card will be sold elsewhere that you need to activate. For example, if you sell online with a non-integrated provider, or are trying to issue cards without a transaction (such as donating cards), the only way to activate cards is via the Gift Card import from Products>Gift Card. Vextend provides an alternative solution.
Please note: Creating gift cards in this manner goes outside the normal Lightspeed transaction flow. When you use this tool, no users will be attached to the sale, and there will be no physical transaction that can be looked up for this card. From the Lightspeed part of the reports, you will still be able to see when and amounts of transactions, but clicking 'View Transaction' will lead no where, because there is no actual transaction. We are simply forcing balance changes to the card. Because of this, only allow access to computers with this API enabled for people you fully trust.
- Make sure to follow the steps above to enable Gift Card Management.
- Now, click the 'Create New Card' button.
- Fill in the Card Number and Value to Add fields. Expiration date is optional and will use account default if left blank.
- Click 'Activate Card' to activate. If it worked, a short message will appear and the page will refresh now showing your new card.
Editing Gift Cards
- Make sure to follow the steps above to enable Gift Card Management, and read the important notes under Creating New Cards.
- In the list of cards, click the pencil icon on any row to edit.
- Card number field is locked. Click a different pencil to load a different card
- Fill in the Value to Add field. Positive value will add a balance, negative value will reduce the balance. Zero amounts are not allowed by Lightspeed. If you are simply trying to change an expiration date, you will need to run two transactions where you add $1, and then subtract $1. This will still affect the total sold value. It's not perfect, but it's a workaround.
- Expiration date is optional and will use account default if left blank.
- Click 'Edit Card' to activate. If it worked, a short message will appear and the page will refresh now showing your new card info.
Workflows
Workflows are a special part of the Lightspeed API that is only available to Enterpise plan customers. However, it might be able to be added for a minimal or no cost by contacting support.
Even if you have workflow support in Lightspeed, at this time this feature is only available to users with special permission from us as we have to put some load on our server to provide this feature. Please contact us if you are interested in being an early tester.
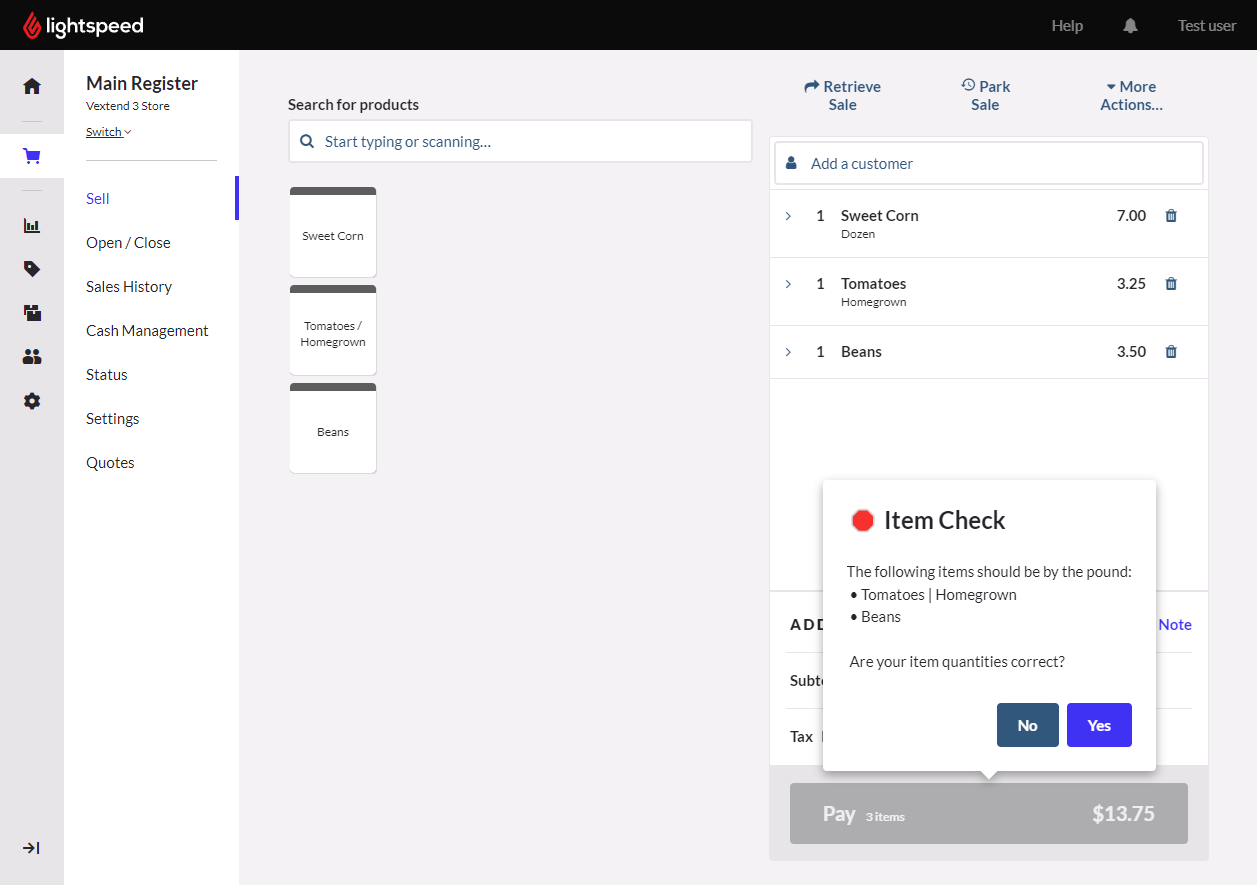
Weighted Items
This new feature helps out stores that have weighted items. By default, items always ring up as qty 1 on the sell screen, but there is no way to prompt the user for a weight, so you must rely on staff remembering to change the quanitity. Using Workflows, from the product edit page you indicate which products are weighed. Then, if a cashier tries to advance to the payment page with any of these items rung up for a quanitity of '1', a confirmation message will appear forcing the staff to check their items before continuing. At that point they can edit the item or continue the sale. The devices running the register do not need the extension to use, so this is compatible for both iOS and web devices.
Extension Options Page
By default, the options page is locked to admin access only (can be changed after an Admin logs in).
Unlock Settings Page as Admin
- Log into you Lightspeed account as an Admin.
- From any page that the extension modifies something (Product Search, Consignments, Reports>Gift Cards), click the user name in upper right corner. This will tell Vextend what type of user you are.
- Now, click the extension icon to open the settings page.
- If you were a valid Admin (or Manager if that option is enabled), you can now see the full the settings page.
- This page will remain accessible for the remainder of the Chrome session, even if you change users. To protect this page again, close Chrome.
- If on the first try it doesn't unlock, close the Settings tab, and follow the above steps again. We aplogize this is a little glitchy at times, but it's the only way we can verify users at this time as we never access any of your login data.
Possible Settings
- API Access: Required for using the following features
- Vextend Super Import
- Gift Card Management
- Product Quick Edit
- Enhanced Stock Control Receiving/Label Printing
- Weighted Item Workflows
- Extension Protection: Set what type of users can change settings on this page.
- Gift Cards: Enable if gift card features will appear
- Workflows: Weighted Items Enable a Lightspeed workflow that will determine if an item shouldn't have a qty of '1' because it is weighted, and warn the cashier.
Please note that any user of the device will have access to any features that are enabled. For example, if API access is setup and the Gift Card feature is enabled, any user of this device can access the Gift Card features even if no one is logged in. Protection only applies to being able to change the settings.
API Access
API access allows Vextend unlock features where it can access more data than what is visible on a page, and in some cases push new info into the database for your store. This extension only uses API access when necessary, and your API token resides locally in your browser. Any features that require API access will not be available unless you have enabled it.
API access currently unlocks additional features on the following pages:
- Products
- Stock Order Receive
- Stock Order Import (SuperImport Tool)
- Gift Cards
Enable API Access for Vextend
- First, you need to get an API token. See Lightspeed's instructions here. Treat this token like a password, and only use it on computers with trusted users. You can delete a token from your account at any time to remove access.
- With the token copied to your clipboard, go to the Vextend Options (make sure you have unlocked protection on the options page). Click on the plug extension icon to the right of your addess bar in Chrome. (If you don't see the icon, click the puzzle piece icon, then click the pushpin next to Vextend).
- In Vextend Options, paste the token and fill in your store's .vendhq.com (or retail.lightspeed.app) domain.
- Click 'Test Connection'. If it worked, you will get a popup that the connection test worked.
- To complete, you must click the 'Save API Access' button.
- Now, reload any page that requires API access and the new features will appear.